This installation guide is for our wireless Apple CarPlay/Android Auto module.
What’s included


Installation diagram

Further installation detail
The primary MMI unit and climate control panel must be removed.

Audi/VW radio removal tools are required for this.

Once you hear a “click,” you can remove the unit by inserting the keys into the two holes on the booth’s sides.


Simply grip the climate control panel and pull; there are no screws involved. They are held on by clips.
REMOVE AIRVENTS, SILVER TRIM AROUND SCREEN, OR CLOCKS IS NOT REQUIRED.
Rear connections for MMI

CIRCLE IN RED
Connect the ends of the LVDS cable here, to the device, and finally to the wire that has been connected to the MMI.
GREEN SQUARE
Going on are the primary harnesses. one end to the box, one end to the old MMI connector (which was connected previously with the central mmi unit),
YELLOW SQUARE (BOTTOM PHOTO)
The Apple CarPlay/Android Auto module will receive it.
BLACK SQUARE (BOTTOM PHOTO)
Link the two of them.

BLUE SQUARE (TOP & BOTTOM PHOTO)
To the climate panel goes this one. Simply unplug everything and connect one end to the panel and the other to an old wire.

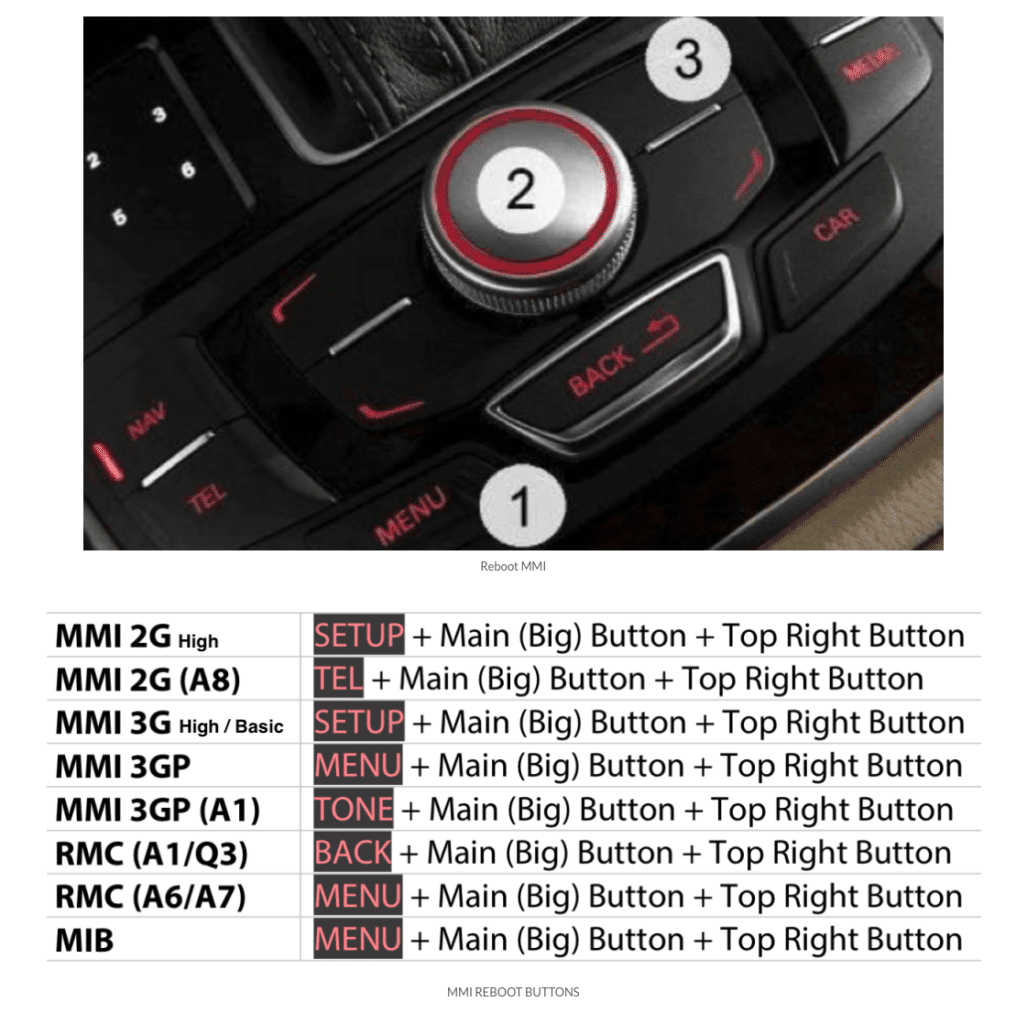
MMI 3G DIP SWITCH
Box comes by default with correct dip switch settings, do not change them.

Therefore, the dip switch on a AUDI A4 2014 should look like:
1 – OFF
2 – OFF
3 – OFF
4 – OFF
5 – OFF
6 – OFF
7 – ON (if you have parking enabling button in climate panel) (if you have parking enabling button in climate panel)
8 – ON (if you automobile is equipped with bluetooth system) (if you car is equipped with bluetooth system).
Sound settings
You may have noticed that there is no sound if you have already tried the system. We will enable AUX if your vehicle has an AMI port in the glove box, but you do not need to connect anything to the AUX at this time. It needs to be enabled for our box because it will already be using CAN to connect to the AUX.
You must have access to the Hidden Green Menu; if you don’t, there is a solution here – CLICK.
The activation process for the Audi MMI 3G AUX.
- Place the key in position II and wait for the MMI 3G system to launch. Keyless buttons are another option.
- After about five minutes, press and hold the MENU (or SETUP) and CAR buttons.
- A secret green menu will show after a little while. Now you can let go of the buttons.
- Go to settings > AMI/AUX > Diagnosis.
- While maintaining the other settings, change the value of “AUX” from “disabled” to “enabled”.

- To escape the green hidden menu, press the RETURN and CAR buttons simultaneously.
- Start the MMI again
Please keep in mind to select AUX as your media source if you are using the Apple CarPlay or Android Auto module!
USB port and antenna installation.
The antenna, which has a quite powerful signal, can be disguised behind the device with a box or, if you like, you can attach it under the gear selector.
We advise using an extension lead for USB and dragging it to the armrest.

Taking apart the center tunnel


The wifi antenna can now be moved to the main tunnel and attached to the tunnel wall.
The USB extension lead is comparable, except you may move it from the seat directly to the armrest.
Finished
You can now test the module to see if it functions. Start MMI, wait a short while, then push and hold the NAV button for a short period of time (you should hear a CLICK sound from the box). On MMI, you should notice that the module has begun.
You’ll notice Wireless on the display. It is for wireless Apple CarPlay, and your iPhone can be connected there (all details to connect should be there).

[…] Excellent external modules that are simple to plug and play are available from us (click). You may obtain the product’s installation instructions and further information here (click). […]